
As bloggers, we have to add a lot of tags to our blog for conversion tracking, remarketing, gathering analytical data, event tracking and more.
With the passage of time, it becomes tough to manage all tags. What if you could manage all tags from a single dashboard?
This is why Google Tag Manager came to the scenario.
Google Tag Manager (GTM) is a free tag management tool that makes it insanely easy for bloggers and marketers to add and edit tags and code snippets from a single place. This is the ultimate tool for managing tags.
Another amazing thing about GTM is that it will not slow down your site because of slow loading tags.
In this post, I will show you how setup Google Tag Manager in WordPress. It’s very easy to do. Just follow this tutorial.
[toc]
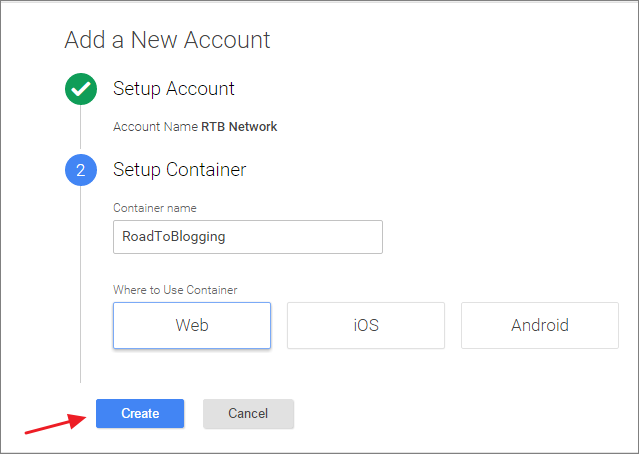
How to Add a New Account in Google Tag Manager
At first, go to Google Tag Manager and click on “SIGN UP FOR FREE” to login with your existing Google account.
After login to your account, you have to enter an “Account Name”. Just provide your company’s name and click on “Continue” button.

Then you need to add a container. A container could be your site name or app name. Now enter your container name and select where you want to use the container.Then click on “Create”.
A box will be popped up with Google Tag Manager user policy. Click on the “Yes” button to accept the terms.
After creating the container, you will be asked to add a code to every page of your website. You have to add this code after the opening <body> tag.

This is the last tag that you are going to install on your WordPress blog.
Adding Google Tag Manager Code to WordPress
You can add tag manager code in WordPress by editing header file. Just edit header.php and paste code after <body> tag. If you don’t want to edit the header file, you can do it by using a plugin.
I prefer using Insert Headers and Footers plugin. Once you’ve installed and activated the plugin, go to WordPress Admin Panel > Setting > Inserts Headers and Footers. Then paste the code in the header section and click on save button.

However, some WordPress themes have the built-in option for adding scripts. For example, I am using Thrive Themes and it has a built-in option for adding analytics and scripts. Check if there is such option in your theme.

Once you’ve added the code, visit your site. You will notice Google Tag Manager Quick Preview on your site.

Showing this preview means you’ve installed tag manager code successfully.
You can hide Google Tag Manager preview from your site. Just go to Google Tag Manager page and click on “Leave Preview Mode”.

It will ask whether you want do disable preview mode or not. Just click on “Ok” button. It will stop showing the preview.
Adding & Publishing a Tag in Google Tag Manager
Now let’s see how to add a tag in Google Tag Manager.
At first, click on “Add a new tag”.

You will see different tag types there. If you want to add ‘Google Analytics‘ tag, select ‘Google Analytics’.
For the sake of this tutorial, I am going to add Facebook Pixel Code. As there is no built-in tag for Facebook, we have to do it by adding custom HTML tag. Just click on “Custom HTML Tag”.

Then enter the Facebook Pixel Code under “Configure Tag” and click on “Continue”.

You can choose where you want to add the tag. Here I will add the tag on all pages.

The tag will not go live until you publish the container. Before publishing, you can see the preview on your site. Click on “Preview”.

Now go to your site. Google Tag Manager will show the Tags fired on each page.

If you find your tag on preview, go back to Google Tag Manager and Publish the tag.

That’s it. You are done. You have successfully installed a tag by using Google Tag Manager.
Over to You
I hope this post helped you to setup Google Tag Manager to your WordPress blog. If you have any questions regarding this, let me know via comment.
However, if you found this post useful, help me by sharing this post on Facebook, Twitter or Google+.
Leave a Reply