
Moving WordPress site from one hosting to another isn’t an easy job if you don’t have technical skills. The GOOD news is, HostGator makes it insanely easy!
Just fill out HostGator Transfer Form and they’ll take care of the rest.
HostGator has a dedicated migration team that will move your WordPress site to HostGator for free with zero downtime.
HostGator is the host with which I started my blogging journey. At that time, they were very popular for technical supports. After getting acquired by EIG, they lacked on tech supports and I faced several downtimes. Then I decided to move to Bluehost which is also owned by EIG.
I was happy with Bluehost until I faced several big downtimes within a month. At that time, I came to know that HostGator launched Optimized WordPress Hosting (OWP) with some great features like Automatic WordPress Updates, Daily Backup, Auto Malware Removals etc.
HostGator OWP seemed promising to me and I decided to move my WordPress sites to HostGator. In this post, I will be sharing the step-by-step process. Here are the steps we are going to take.
- Sign Up for HostGator Without Canceling Old Host
- Take a Backup of Your WordPress Site
- Fill Out HostGator Transfer Form
- Preview Your Site
- Change Your Domain Name Servers (DNS)
The whole process might take some times to complete. But you won’t face any downtimes during the process.
Disclosure: This post contains affiliate links. If you make a purchase through these links, I’ll get some commissions.
Step #1 – Sign Up for HostGator Without Canceling Old Host
The first step is to join HostGator.
You can get started with HostGator Shared Hosting or Managed WordPress Hosting. Shared Hosting is a good choice if your blog is new and generating less traffic. If your blog has a good amount of traffic and you are generating money out of it, I’d suggest to go with Managed WordPress Hosting.
For the sake of this tutorial, I am assuming that you are going to buy Shared Hosting. You can get started with Shared Hosting for just $0.01!.
Just go to HostGator.com and click on “Get Started Now” button. On the next page, you need to choose a plan. It offers 3 plans – Hatchling, Baby, and Business. If you are a blogger, I’d suggest you to choose Hatchling or Baby plan.
The basic difference between Hatchling or Baby is, Baby plan allows you to host unlimited websites where you can host only one website in Hatchling plan. If I were you, I’d go with Baby plan.
Once you’ve chosen the plan, click on “Sign Up Now” under the plan.

Then you’ll be landed to the “HostGator Order Form”. Enter your domain name, billing info and uncheck the all additional services.
If you are going to buy hosting for 1 month, use the coupon code RTB1CENTHOSTING to get your first month hosting only for one cent. Otherwise, you don’t need to change the coupon as you are getting 30% off on your total purchase.

Just complete the payment. You will get a confirmation email.
Now you have an account on HostGator. You are one step closer to move your site to HostGator. Just keep this a secret from your old host and don’t cancel the old hosting account.
Note: You have to transfer your site within 30 days of signup to get free transfer from HostGator.
Step #2 – Take a Backup of Your WordPress Site
Before doing anything else, it is recommended to take a backup of your WordPress site.
There are several tools and plugins available to backup your WordPress blog. I prefer using ManageWP. You can take a full backup (Files + Database) on your server and computer by using it within few minutes.
Note: The backup is only available on ManageWP Premium version. However, it offers 14 day trial of premium version with its Free plan. So I’d suggest you to take the backup within 14 days if you don’t want to buy the premium plan.
Now go to ManageWP.com and click on “LET’S GET STARTED” button. Then enter your email address and click on “TRY IT FOR FREE”.
On the next page, you will be asked to add your WordPress site to ManageWP through ManageWP Worker Plugin. You need to enter your admin password if you want automatic installation. However, you can install and active the plugin from your WordPress dashboard. On that case, you don’t have to enter admin password to ManageWP.
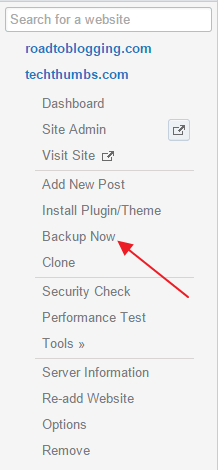
Once you’ve added the site to ManageWP successfully, click on “Backup Now” from the left sidebar.
A box will be popped up. Select Backup Type as ‘Full’ and click on “Next”.

Once the backup has completed, check “Recent Backups” and download the backup to your computer. (Follow screenshot)

Keep the backup safely to your computer.
Step# 3 – Install WordPress on HostGator
On this step, you need to install WordPress on your new hosting account.
Installing WordPress on HostGator cPanel is very easy. Just login to your cPanel and click on “QuickInstall” under “Software/Services”. Then install WordPress by providing necessary information. Check this step by step tutorial on installing WordPress on HostGator.
If you’ve signed up for HostGator Optimized WordPress Hosting, the process is a bit different. But it’s easy. Just login to HostGator Customer Portal and click on “Hosting” from the header. Then click on “Create Blog”. (Follow screenshot)

On the next page, enter your WordPress URL and Blog Title. And click on “Add Blog”.

That’s it. You are done.
Step#3 – Fill Out HostGator Transfer Form
Now you need to provide your HostGator info and old host info to HostGator Migration team.
At first, go to HostGator Transfer Page and select the type of account you have with HostGator.

On the next page, enter your HostGator account information so that they can transfer the data to your new host.

Then provide old hosting account information from where the data will be transferred.

It will say “Transfer In Progress”. It might take 24-72 to transfer your site to HostGator.

Then HostGator Migration Team will send you an email asking your WordPress Dashboard URL, Username, and Password. Read the email properly. If everything seems OK to you, provide your information and give them the permission to proceed.
Once they’ve started the migration, they will keep you updated on the status of your migration. And if you have any question, feel free to ask them.
Sometimes they may ask you to provide your FTP information. If you have FTP access to the source server, just provide the information. If you do not have FTP access, let them know. They will use other methods.
Step #4 – Preview of the Site
Once they have finished migrating your WordPress site content, they will ask you to preview your site to ensure everything has been moved correctly.
Now you need to edit your personal computer’s hosts file to preview your site without changing the DNS. Here’s how to change hosts file.
HostGator will send you the line that you have to add to your hosts file. It will be something like 108.122.XXX.XX roadtoblogging.com www.roadtoblogging.com.
Once you’ve edited the hosts file, go to your site and check if everything is OK. If there is any issue, contact with HostGator Migration team.
Step #5 – Change Your DNS
If everything is working properly, it’s time to update your DNS.
Just go to your domain name provider and edit nameservers. I am going to show you how to do it on Namecheap.
At first, login to your Namecheap account and go to “Domain List” from the left-hand side. Then click on “MANAGE” beside the domain name.

Then edit nameservers to point your domain to new hosting. You can get HostGator nameservers from the last email they sent you while migrating. You can also get it from your hosting account.
Click on “Tick” sign to save the new nameservers.

That’s it.
As you have WordPress site installed on both hosting accounts, you will not face any downtime. DNS changes may take 24-48 hours to fully propagate to new account’s server. In the meantime, your site will be loaded from old hosting.
I’d suggest you not to make any changes to your site or update any posts during DNS propagation. It won’t be reflected on your new account.
However, if you are using CloudFlare, you don’t need to change your DNS. All you have to do is, change your “points to IP Address” on CloudFlare.
Just login to your CloudFlare account and select the site. Then click on “DNS” from header and change the IP Address. This is the same IP Address that you’ve add to your hosts file to preview your site. You can also get it from your hosting account.

You don’t have to click on any save button. Just paste the new IP Address.
If you want to transfer your domain to HostGator for free, read this.
Over to You
I hope this step-by-step tutorial helps you to move your WordPress site to HostGator. If you face any difficulties while migrating, take help from HostGator Live Chat. They are very helpful.
If you have any confusions in any steps, let me know via comment.
Don’t forget to share your experience with us.
Leave a Reply